This is the post for the September 2, 2014 class meeting.
Today we will talk about the five modes of expression, continue going over WordPress tools, and end with another blog post.
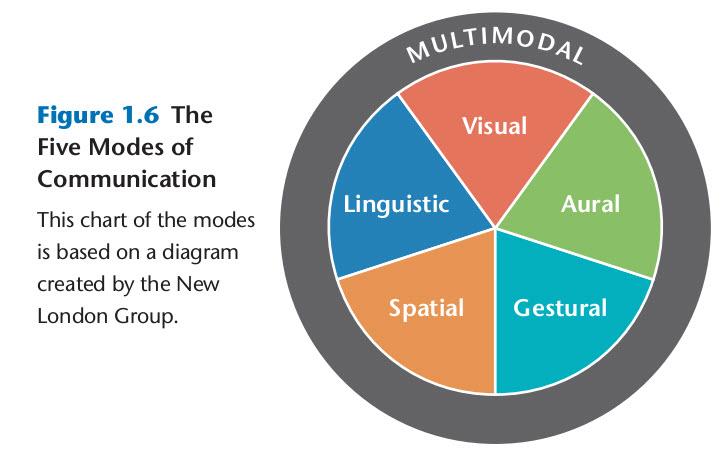
What Are Multimodal Projects?
I asked you to read Chapter 1 of Writer/Designer so that we can begin using the language and ideas in the text as you work on your first project. We will do a multimodal activity in class on Friday that you will post on your blogs. Today, I want to review the terms that the book covers:
WordPress Posts versus Pages
In WordPress, Posts are the regular pieces that you write, like the journal entries you did at the end of the last session. Usually, your Posts show up on the main page (homepage) for your blog. Pages are static pages that are often used in your menus. The process of writing Posts and Pages is the same; the difference is where they show up on the site.
For Project 1, the entries you write for each class period with the headings “What I Did” and “Why I Did It” are Posts. The additional pieces that are required are Pages (e.g., the About Page, a Site Information Page).
Walking Through Some WordPress Tools
You will probably use all of the following tools as you work on your site. If you get lost, there is a Help link in the upper right corner of each of these pages that should help:
-
Go to Posts > All Posts, and choose the Quick Edit option to make changes to the title, categories, or status.
- When writing or editing a Post or Page,
- Use the Add Media button (under the title, above the writing area) if you want to include images or other resources. Note that you can change size and alignment. Always add an Alt Description.
- Use the Proofread Writing button to spellcheck.
 You can change the proofreading settings by going to Users > Personal Settings.
 -
Go to Posts > Categories to set up organizational tags for your blog posts. I suggest you set a general Category of some kind as well as a Category for each of the projects you will work on this term.
-
Use Appearance > Themes to change the overall look of your blog. Be sure to choose the FREE link in the upper right side.
-
Use Appearance > Customize to change the basic layout and appearance of your blog. Note that the options you can customize change from one theme to the next.
-
Use Appearance > Widgets to choose the information and tools that appear in your sidebar(s) and/or footer. Most Widgets will have specific settings you need to add. As you are choosing Widgets, remember the value of simplicity to a good website design.
-
Use Appearance > Menus to setup the navigation for your site. For your Project 1, you will want to create a Menu that gives readers access to all of the pages you create. You can add Menu items for Pages as well as for Links to your own or another blog or website. You have to indicate where the Menu should appear on your site.
-
Usually Appearance > Header is the place to change the header image for your site. You may also be able to change it under Customize or Theme Options. Pay attention to the details about the size for your image. You may need to crop the image to make it work for your site.
-
Use Appearance > Background to change (obviously) the background image or color for your blog.
Today’s Blog Post
Create a blog post that talks about the work you have done on your blog since we met on Monday. Remember these blog posts are how you will document your on-going work and effort on the projects:
- To create a new blog post, go to the Posts tab on the left and then choose Add New.
- Write a summary of and reflection on the work you have done. Your work can include thinking; it is not limited to doing.
- Be sure to click on the Text tab if you want to code your own HTML.
- Organize your post with two headings: (1) What I Did, and (2) Why I Did It. Tip: Think about how you can use what you know about multimodal composing to make the headings stand out.
- Publish your post, and check that is shows up on the class megablog.
Homework
Go to the class megablog and read the entries of at least three other students. For each post that you read, add a comment that offers feedback, advice, and/or encouragement. Aim for a comment of at least two or three sentences.
Look for a blog at least one student whose blog does not have any comments yet. If a blog already has three comments, please choose another blog (or just don’t count your comment as one of the three you need to do). I want every students to get at least one comment.
Additionally, if you have not emailed me the link to your blog, please do so by 5 PM Wednesday (9/3) so that I can add you to the class megablog.