Multimodal Dig

Ninja ModeThis is the post for the September 5, 2014 class meeting.

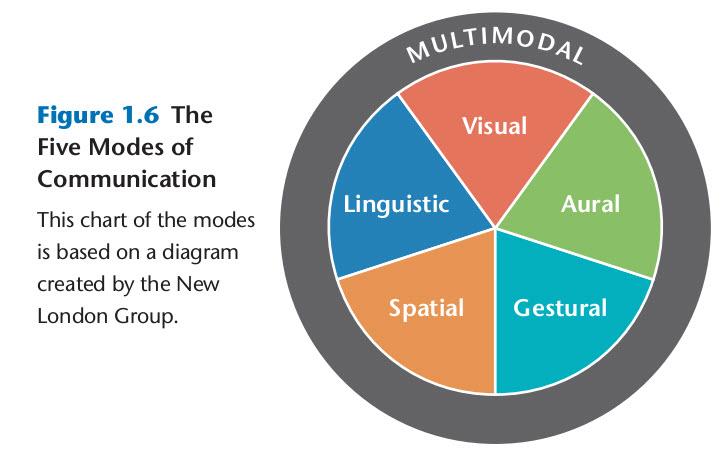
Today’s activity explores the multimodal texts that you interact with every day. The short-term goal is for you to familiarize yourself with identifying the modes of communication. The long-term goal is for you to be able to identify these modes in your own work and think about how you are using them in your Web Portal projects.

Odds and Ends

  • Don’t forget that you can Hear Kristin Arola this afternoon. Kristin is one of the authors of our textbook, Writer/Designer.
  • If you have not officially declared Professional Writing as your major or minor, please do so ASAP by contacting Kathryn V. Graham (kagraham@vt.edu), the English Department’s Advising Coordinator.
  • If you have not sent me the URL to your blog, please do so. I think one of you is still missing from the class megablog. If you fail, you will be called out for the Failure to Follow Instructions Award.
  • Also, please make sure that you have comments turned on so that your classmates and I can leave you feedback. You can choose settings that let you review the comments before they are public if you want by going to Settings > Discussion.

Important Dates

  • Wednesday, September 10: Draft of P1: Web Portal due in class for Peer Review
  • Monday, September 15: P1: Web Portal due
  • Monday, September 22: P1: Web Portal deadline (end of grace period, no work accepted after 11:55 PM)

Multimodal Dig

Today we are going on a multimodal dig, a sort of personal scavenger hunt for multimodal texts.

  1. Begin by digging through your backpack or bag to locate all the multimodal texts that you have with you. Think broadly and creatively. Look for texts, not devices. For example, your smartphone is a device, but Candy Crush Saga is a multimodal text on that device.

  2. Go to your WordPress site and create a blog post that lists the multimodal texts you have with you. It doesn’t have to be an exhaustive list. Aim for at least 12 texts.

  3. Once you have your list, label the items with the modes they include. You can use the first letters (e.g., L=Linguistic, V=Visual). See the image from Wednesday’s post or page 4 of Writer/Designer if you need a refresher.

  4. If you can, take a photo of a particularly unusual multimodal text or of your entire collection and add it to your blog post.

  5. Add some reflection on the items you have listed, using the following questions to help you think about the patterns you see. You don’t have to answer every question. Just use them to get started.
    • Which texts use all five modes of communication?
    • What patterns do you see across the texts?
    • Are they similar types of texts?
    • Do they come from a similar time period or location or publication?
    • Which two texts are the most different from each other?
    • How are the modes used in those texts, and does that contribute to how different they are?
  6. Once everyone has posted, I will ask you to share your most unusual text with the class.

Homework

Continue working on your site. Think about the ways you can include multiple modes of communication in your project. We will talk about the About page and the Site Information page on Monday. You will have time to work in class most of next week. Be prepared to share your work with me during one of the sessions (Monday and/or Friday). Wednesday, you’ll share your draft site with two other students in class.


Hear Kristin Arola on Friday

On Friday, September 5, Kristin Arola, Associate Professor of Rhetoric, Composition, and Technology and Director of the Digital Technology and Culture Program at Washington State University, will be giving a talk as part of the CATH’s Digital Discussions in the Humanities and Social Sciences.

Dr. Arola’s talk, which will take place at 2 pm in 1100 Torgersen Hall, is titled, “Slow Composition: An Indigenous Approach to Digital Making.” Please see the flyer for more information about this event.


Customizing Web Portals

This is the post for the September 2, 2014 class meeting.

Today we will talk about the five modes of expression, continue going over WordPress tools, and end with another blog post.

What Are Multimodal Projects?

I asked you to read Chapter 1 of Writer/Designer so that we can begin using the language and ideas in the text as you work on your first project. We will do a multimodal activity in class on Friday that you will post on your blogs. Today, I want to review the terms that the book covers:

Five Modes of Communication

Image from page 4 of Writer/Designer

WordPress Posts versus Pages

In WordPress, Posts are the regular pieces that you write, like the journal entries you did at the end of the last session. Usually, your Posts show up on the main page (homepage) for your blog. Pages are static pages that are often used in your menus. The process of writing Posts and Pages is the same; the difference is where they show up on the site.

For Project 1, the entries you write for each class period with the headings “What I Did” and “Why I Did It” are Posts. The additional pieces that are required are Pages (e.g., the About Page, a Site Information Page).

Walking Through Some WordPress Tools

You will probably use all of the following tools as you work on your site. If you get lost, there is a Help link in the upper right corner of each of these pages that should help:

  • Go to Posts > All Posts, and choose the Quick Edit option to make changes to the title, categories, or status.

  • When writing or editing a Post or Page,
    • Use the Add Media button (under the title, above the writing area) if you want to include images or other resources. Note that you can change size and alignment. Always add an Alt Description.
    • Use the Proofread Writing button to spellcheck.
      Proofread Writing buttonYou can change the proofreading settings by going to Users > Personal Settings.
  • Go to Posts > Categories to set up organizational tags for your blog posts. I suggest you set a general Category of some kind as well as a Category for each of the projects you will work on this term.

  • Use Appearance > Themes to change the overall look of your blog. Be sure to choose the FREE link in the upper right side.

  • Use Appearance > Customize to change the basic layout and appearance of your blog. Note that the options you can customize change from one theme to the next.

  • Use Appearance > Widgets to choose the information and tools that appear in your sidebar(s) and/or footer. Most Widgets will have specific settings you need to add. As you are choosing Widgets, remember the value of simplicity to a good website design.

  • Use Appearance > Menus to setup the navigation for your site. For your Project 1, you will want to create a Menu that gives readers access to all of the pages you create. You can add Menu items for Pages as well as for Links to your own or another blog or website. You have to indicate where the Menu should appear on your site.

  • Usually Appearance > Header is the place to change the header image for your site. You may also be able to change it under Customize or Theme Options. Pay attention to the details about the size for your image. You may need to crop the image to make it work for your site.

  • Use Appearance > Background to change (obviously) the background image or color for your blog.

Today’s Blog Post

Create a blog post that talks about the work you have done on your blog since we met on Monday. Remember these blog posts are how you will document your on-going work and effort on the projects:

  1. To create a new blog post, go to the Posts tab on the left and then choose Add New.
  2. Write a summary of and reflection on the work you have done. Your work can include thinking; it is not limited to doing.
  3. Be sure to click on the Text tab if you want to code your own HTML.
  4. Organize your post with two headings: (1) What I Did, and (2) Why I Did It. Tip: Think about how you can use what you know about multimodal composing to make the headings stand out.
  5. Publish your post, and check that is shows up on the class megablog.

Homework

Go to the class megablog and read the entries of at least three other students. For each post that you read, add a comment that offers feedback, advice, and/or encouragement. Aim for a comment of at least two or three sentences.

Look for a blog at least one student whose blog does not have any comments yet. If a blog already has three comments, please choose another blog (or just don’t count your comment as one of the three you need to do). I want every students to get at least one comment.

Additionally, if you have not emailed me the link to your blog, please do so by 5 PM Wednesday (9/3) so that I can add you to the class megablog.


Getting Started on Web Portals

Shhhh. Iz blogging.This is the post for the September 1, 2014 class meeting.

Today we’re diving into WordPress and learning about all the features built into the tool. By the end of today’s session, you have created a WordPress blog and done some basic configuration.

Creating Your Blog

If you want to create a blog on a site other than WordPress.com, hop to it. You are free to work at your own pace. Otherwise, follow along as we complete these tasks:

  • Create a username, password, and a name for your blog using the sign-up form on WordPress.com.
    • Remember that your blog will be public.
    • Choose .wordpress.com for the domain (the free option).
  • Scroll down to the bottom and click Create Blog (the free option).
  • Fill in the form to set your Blog Title and Tagline, and click Next Step.
  • For now, accept the default Theme by clicking Next Step.
  • Skip the customization step, and click Next Step. (You will want to look at all the Theme options before you put work into customizing things.)
  • Connect with Facebook or Twitter if you like. I recommend skipping it, and clicking Next Step. You can connect later when you have some content on your site.
  • Go to your email and find the confirmation message. You need to click the link in that message to finalize your blog’s setup.

Congratulations! You now have a blog. Let’s customize some of its settings:

  • Go to the Users tab on the left and then choose My Profile to update your profile and login information. You can change the way that your name is listed with each post, for instance. You can also change your password on this page.
  • Go through the Settings tab and update the information. In particular, be sure that you
    • Go to the General setting and fix the timezone. You can also change the Tagline here.
    • Go to the Discussion setting and decide when you want the site to email you.
  • If time allows, you can begin looking at the Themes that are available. Go to the Appearance tab on the left, and choose Themes. Be sure to choose the FREE link on the left. Please don’t spend money on a Theme. I don’t want you to need to spend any money on this site.
  • Finally, write your first post. Go to the Posts tab on the left and then choose Add New.
    • Write a summary and explanation of the decisions you made as you were working today. You will write this kind of post at the end of most class sessions from now on. It’s how you will document your on-going work and effort on the projects.
    • Be sure to click on the Text tab if you want to code your own HTML.
    • Organize your post with two headings: (1) What I Did, and (2) Why I Did It.
    • Talk briefly about the name and tagline you have chosen for your blog, any other decisions you made, and anything you are considering or hoping to do.
    • Publish your post, and send me an email (tengrrl@vt.edu) with the URL to your first post. I will use the link to set up a megablog that includes everyone’s updates.

Homework

  • Read Chapter 1 of Writer/Designer so that you are familiar with the terms we’re using in class as we discuss multimodal projects.
  • Explore the resources in WordPress. We’ll spend Wednesday’s class session working on Themes, Widgets, and Menus. If you want to get a headstart, look at the information under Step 2 on the Assignment page.
  • If you need help or get curious, try the WordPress.com Support and Tutorials. Also remember that you can use the step-by-step tutorials at Lynda.com. The  WordPress.com Essential Training with Morten Rand-Hendriksen tutorial probably has a video for everything you need.


What Makes a Website Good?

This is the post for the August 29, 2014 class meeting.

Today we’ll begin work on Project 1, which means we’ll be talking about effective websites and setting some goals for the project.

Schedule Information

I have added a list of important dates for the course and the university to the site, under the Syllabus menu at the top. I will set up a Google Calendar with the dates and readings next week.

I have set office hours for 11:05 to noon Monday, Wednesday, and Friday (so right after class). I can also meet you by appointment, and you can always email me.Discussing What Makes a Website Good

  1. To get started, let’s talk about what makes a website “good” in the Forums. Here’s the discussion question that I posted there:

    Let’s talk about what makes a website “good” to establish some guidelines for the web portals that you will make for Project 1. 

    For homework, I asked you to find general advice on what makes a webpage work in one of the Lynda.com tutorials linked in the 8/27 blog post. Add a new topic to this forum that tells us the advice you found and whether you agreed with it. Be sure that you use a clear subject line so that we can tell what you are writing about before we click on your topic.

    After you post your advice, read some of the other advice people post and respond. You can add Thumbs Up for advice that you agree with. Add a written comment to at least one other person’s post.

  2. After everyone posts and comments, we’ll talk about the characteristics briefly and I’ll talk about the Digital Text Show & Tell forum.
  3. Finally we will briefly go over the assignment for the first project, Building a Web Portal. I will add assessment information to the assignment next week.

Homework

We will work on setting up the WordPress sites in class next week, so you can begin thinking about a name and the kind of design you would like for your site, but you don’t have to write anything down yet.

Second, begin taking photos you can use to illustrate your blog. You will probably want at least one photo for your About page, either of yourself or something you care about. Depending upon the Theme you decide upon, you will probably be able to add a photo to the header on your website as well. Take some photos that will work with the name and design you are thinking of this weekend and upload them to some place like Flickr, Instagram, or Google Plus Photos so you can get to them in the classroom next week.


Class Logistics and Tools

This is the post for the August 27, 2014 class meeting.

Today we’ll focus on getting familiar with the different online tools that we will all use for the course. Go ahead and login on a computer so that you can follow along on your screen if you’d like.

Contacting Me When Something Goes Wrong

Eventually, something is bound to go wrong, so I want to take a moment to outline what to do when it happens. Whether it is something wrong with one of the tools we are using or something that has gone wrong for you personally, my advice is to keep calm. Consult the FAQ on what to do when something goes wrong for more specific advice.

Tools We’ll Use

Scholar: Our Scholar URL is https://scholar.vt.edu/portal/site/3844f14

Lynda.com: Lynda.com is a tutorial site that is free to all VT students, faculty, and staff.

Forums: Our online discussion forum is http://forum.tracigardner.com/. If you need help figuring out how the forum site works, use the Forum FAQ.

WordPress.com: You will create your web portal for the course and post blog updates on a WordPress site. You can use a WordPress.com blog (recommended), a self-hosted blog, or a Blogs@VT site. If you want to begin learning how WordPress.com works, you can begin exploring the Lynda.com videos for WordPress.com Essential Training with Morten Rand-Hendriksen.

Registering and Posting on the Forums

Complete the following in the Forums:

  1. Register on the forums.
  2. Please choose a professional, classroom-appropriate username. This is a public site, so realize that the name you choose will be publicly available. If you need to protect your privacy (say you are in the witness protection program), feel free to use a pseudonym, but please email me to tell me that pseudonym and your real name.
  3. Be sure to choose the discussion area for Writing and Digital Media when you post and read (and not the other course I am teaching).
  4. If you have any questions about the syllabus, course policies, or anything related to the class now (or ever), add a reply and ask your question on the Syllabus board.
  5. Also in the Syllabus board go to the “Class Introductions” and add a reply, following the instructions on the forum.
  6. After you post your intro, read through the other posts to begin getting to know your classmates.

Homework

Go to one of the Lynda.com tutorials linked above and watch a minimum of three videos of your choice (not all three courses). Look for general advice on what makes a webpage work, and be ready to discuss what you found in class on Friday. Focus on general principles rather than any specific details on how to code something.